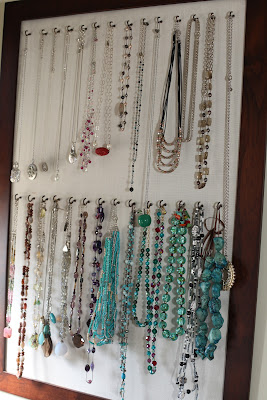
I have seen several ideas online on how to create a jewelry organizer, but never found exactly what I wanted. So...I decided to make it myself!
Do-it-Yourself Necklace Organizer
Picture Frame (any size. I chose 2 20X30 frames)
Roll of Corkboard (the same size as your frame or larger)
Cup Hooks (bought mine in a 100-pack at Home Depot)
Bronze Spray Paint (Optional. I bought Paint & Primer in one)
Duct Tape or Staple Gun
Fabric of your choice (I bought creme-colored linen. Must be at least a few inches longer than the frame size)
Scissors
Box Cutter (Scissors will work if you don't have one)
Measuring Tape
Drill (optional but highly recommended. And I do mean HIGHLY)
Frame hanging method of choice (My frame included hanging hooks/screws)
I could only find brass colored cup hooks, so I bought spray paint to turn them the color I wanted (bronze.) This should be your first step, as they will need to sit to dry. To keep it clean, place the hooks in a cardboard box.
Line them all up so none are overlapping. Bring the box outside, away from...everything you want to keep looking nice. Then spray paint into the box back and forth 5-6 times slowly. I recommend waiting until they dry completely (overnight or for several hours during the day) before you turn them over. I made the mistake of rushing to flip them when they were barely dry --- they ended up sticking to the box when the second side was dry. Haste makes waste!
While you're waiting for the hooks to dry, you can get started on the rest. Roll out the corkboard and cut a very rough amount of what you need so you have a manageable piece to work with. (Feline paperweight optional.)
Lay the frame backing on top of the cork board and use the box cutter to guide your edges.
Secure the corkboard with several pieces of duct tape, flip it over, and lay it back down, aligned with the frame backing. Smooth out the edges so the corkboard lies flat. I tried this both with and without the extra piece of cardboard that comes in the frame. The pro of using that cardboard is that it offers an extra layer of depth to secure the hooks. The con of using the cardboard is that it is not as sturdy as the frame backing and therefore harder to work with. Up to you, but I would toss it.
Cut the fabric so that it's overlapping the corkboard/frame by a few inches.
Fold the fabric over the backing.
This being my first craft project, and knowing I would never see the back of the frame, I decided to use duct tape to secure the fabric. You are of course welcome to use a staple gun to pretty it up. Whatever method you use, make sure the fabric is pulled very tightly before you secure it to the back.
Place the whole thing back into the frame. Be sure to note at this point if the frame has holes for affixing the hanging hooks and secure those now. If there are no guides, decide how you plan to hang it and secure the method now.
Framed Fabric.
Next, you want to line up your necklaces so you where to place the hooks. I made a row of shorter and a row of longer necklaces. I made sure there was enough room in between so my chunkier necklaces did not look cramped in. Play around with it til you have the look you want.
Measure an equal distance between hooks based on the number of hooks you want per row.
Mark your plan with a pencil.
This is where I was soooo happy they had invented drills! My first time ever using one. It's a good thing too because my fingers were really starting to hurt, twisting the cup hooks in by hand! :P I believe I used a 1/16th inch drill bit. (Do I sound like I know what I'm talking about?) :)) First you drill the hole and then screw the cup hooks in. It's okay to drill all the way through each layer because, again, no one will see the back. Be sure to hold the fabric taut because that will keep it from pulling and twisting as you screw in the hooks.
Voila!
All in all, (not including time spent waiting for the paint to dry) this whole project took me under 3 hours. Not bad for my first official craft of the decade!


